
LilyTwinkle If you've ever wondered how people got lights on their clothes, this is your chance to find out. Meet the LilyTwinkle. The LilyTwinkle is a microcontroller that you can wear. It's part of the LilyPad Arduino line. Arduino boards can be programmed to do lots of stuff, including make lights blink or turn on and off based on external stimuli. Don't worry, though - you don't need to program anything. The LilyTwinkle is pre-programmed to make your lights twinkle. So let's get started!
|
What you need1 LilyTwinkle 1 battery holder 1 coin cell battery 1-4 LEDs 1 spool of conductive thread 1 needle Clothes you want to add lights to Paper A pencil 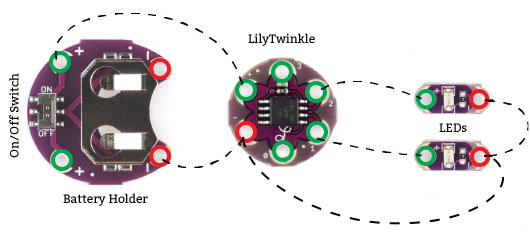
Step 1: Examine the parts
Before you begin any task, it's a good idea to understand what you're working with and plan accordingly. Take a look at each of the parts. They have holes with symbols next to them, either + or - or a number. In the diagram above, the positive (+) terminals are marked in green. The numbers count as positive terminals. The negative (-) terminals are marked in red. There are two very important things to keep in mind:
What is a short circuit? In order to answer that, we have to understand what a circuit is. 
A circuit is a pathway for electricity to flow. A basic circuit is comprised of 3 parts: a power source, a device that uses the power (also known as a load), and wires to connect them. Electricity flows from the negative terminal of the power source, through the wires, to the load, and through more wires to the positive terminal of the power source. Electricity can only move in one direction.
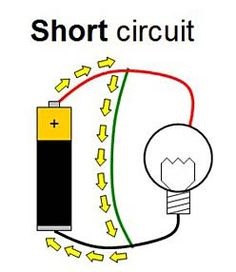
Loads limit the current, or the flow of the electric charge, because it uses up some of that power. But if your wires cross, the power will follow that shorter path (hence the name "short circuit"). If the power doesn't reach your load it won't be activated. What's worse is that the current will continue to loop around from one end of the power source to the other, creating infinite current. It sounds like a good thing, but it isn't. Without the load to limit the current, it will be too strong for the power source to handle and it will do bad things to your circuit, like burn out your power source and damage your electrical components.
This is why the next step is so important. Step 2: Draw out your circuit So you don't accidentally create a short circuit, it's super important to plan ahead and draw out a proper circuit. 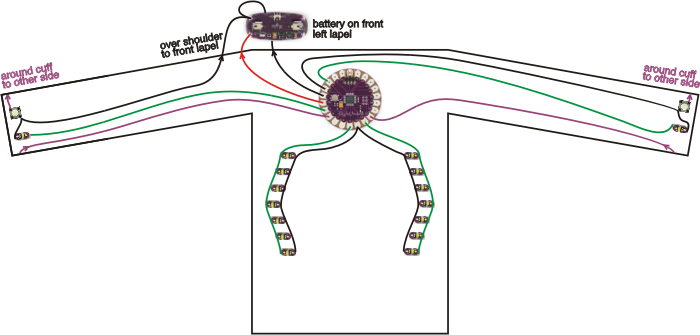
An example of a complex circuit diagram from the creator of the LilyPad Arduino line, Dr. Leah Buechley.
1) Draw out an outline of the cloth you'll be sewing your LilyTwinkle to.
2) Draw out where you'll be placing your battery and its holder. Make sure it's somewhere you can easily access the on/off switch. Draw the positive and negative terminals. There should be 2 of each on the battery holder. 3) Draw your LilyTwinkle and its terminals. It has 1 negative, 1 positive, and 4 more positive terminals marked with numbers 0-3 (In programming, counting always starts with 0). 4) Draw out where you want your LEDs to go, and make sure to mark their positive and negative terminals as well. 5) As we mentioned before, like terminals connect. So draw a line from one of the + terminals on your battery holder to the + terminal of the LilyTwinkle. 6) Draw a line from one of the - terminals on your battery holder to the - terminal of the LilyTwinkle. 7) The numbered terminals on your LilyTwinkle are positive terminals reserved for your LEDs. Draw a line from any one of your numbered terminals to the positive terminal of your LED. Repeat with other LEDs. 8) Draw a line between the negative terminals of your LEDs. 9) Choose the LED closest to your negative terminal on your battery holder. Draw a line from the negative terminal of your LED to the negative terminal of your battery holder. This will connect all your negative LED terminals to the negative LilyTwinkle terminal. 10) Make sure there are no positive and negative lines that intersect. Step 3: Sew it on Now it's time to use your conductive thread. This thread is made from stainless steel fiber so it can conduct electricity, like a soft, flexible wire. Sew your electrical components onto the wrong side of your fabric (the inside of your clothes/the side you don't want the lights on) following the diagram you drew. You can poke a small hole in your fabric to let your LED show through on the right side. 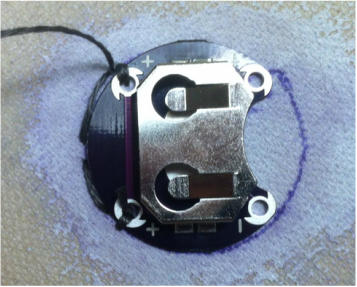
Start by looping your thread a few times through the terminal hole. (Look at the positive terminals in the picture above for an example.) This helps keep your electrical components in place. Then you can use the running stitch (the one that looks like dashes) to create the lines from your diagram that connect your components. Each line between terminals should be a new, separate thread.
When you're done, you can take a little bit of extra thread and loop it through the empty terminals a few times to hold your components in place better. Step 4: Add your battery Place your battery in your battery holder. Make sure that the positive side of the battery touches the positive side of the battery holder, and the negative touches the negative. Step 5: Turn it on! Turn the switch on the battery holder into the On position, and watch it light up! Just a warning! You can't machine wash your clothes once the LilyTwinkle is sewed on, but you can still wash it by hand. |
